Virtual Training Assistant™ Online Help
This page is accessed by Instructors when selecting "View Roster" from the Action column and clicking the Go button.
As an Instructor, you can:
view Class Information, including Roster Counts
view Pre-Class Lessons status and Documents for students
contact Students (sending reminders, updates or "Thank You" notes)
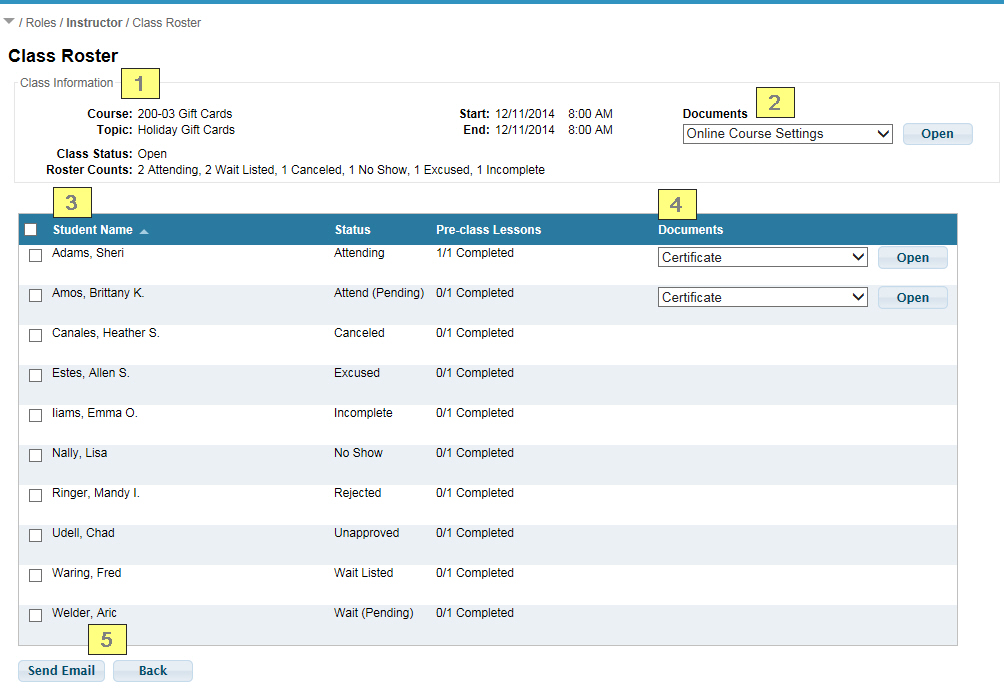
There are five major sections on the Class Roster page (see image below):
Class Information
Class Documents
Student Information
Roster Documents
Action Buttons
 Your System Administrator may chose
to disable the Documents feature. If disabled, you would not see Class
or Roster Documents.

Includes:
Course Title
Class Topic
Start/End Dates
Start/End Times
Class Status
Roster Counts
Class Documents are common files relevant to all students in the Class Session, such as a PDF of the Power Point covered in class or Post-Class Instructions for all Students.
One or more files may be available on the list for selection.
Click Open to view the file.
If a session does not have an associated Class Document, the section will be hidden.
The Class Roster grid includes:
Student Name
Status
Pre-class Lessons
Documents
The Student Name and Status columns are sortable by clicking the column header name.
The name of the student.
The student's enrollment status.
 For an explanation of each possible
Status code, see Student Status Codes.
The number of Pre-Class Lessons completed for the number of Pre-Class Lessons required.
Roster Documents are files relevant to a specific student, such as a PDF of their Completion Certificate.
One or more files may be available on the list for selection.
Click Open to view the file.
If a student does not have an associated Roster Document, the section will be hidden in their row.
 Your System Administrator may chose
to disable the Documents feature. If disabled, you would not see Class
or Roster Documents.
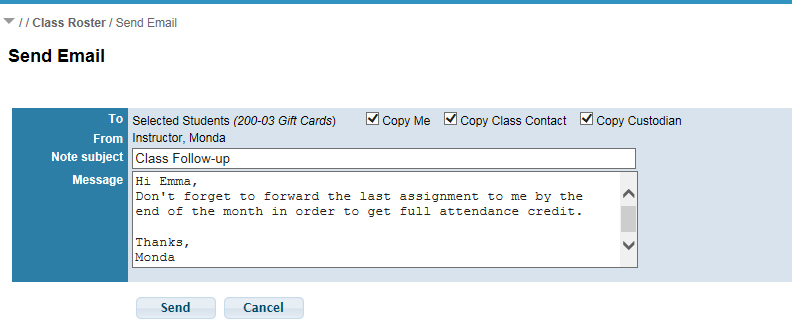
When one or more students are selected on the grid, clicking the Send Email button will start the Instructor Send Email tool.

Enter the Note Subject and Message for your note.
Select who should receive a copy of the email:
Copy Me (Yourself)
Copy Class Contact (Set on the Class Session)
Copy Custodian (Set on the Course)
Click Send button to send the email or click Cancel to exit the Send Email tool.
The Copy options will be disabled if:
The recipient does not have an email address on their Student Profile.
The email address for one of the options matches one of the other choices. For example, if the Class Contact and the Course Custodian are the same person.

Takes no further action and returns to previous grid (Instructor Schedule or History).