Virtual Training Assistant™ Online Help
This page displays required training assigned to be completed by a set Due Date, instructor-led training you are currently enrolled to attend or optional courses you were offered.
Training is assigned to you for a variety of reasons. You can determine how something was assigned to you by:
Viewing the requirement's Tooltip (more about Tooltips below)
Running your Student Status Report that shows every course currently assigned to you and why (Requirement Type column)
If you are set as a Supervisor of a person, Team, Department or Work Area, you can use the My Plan page to view training assignments of your associated people.
There are three major sections on the My Plan page (see image below):
 This page can be added to Your Favorites
(
 ) or set as your
Learner start page (
 ) by clicking the icon in the
top-left corner of the page.
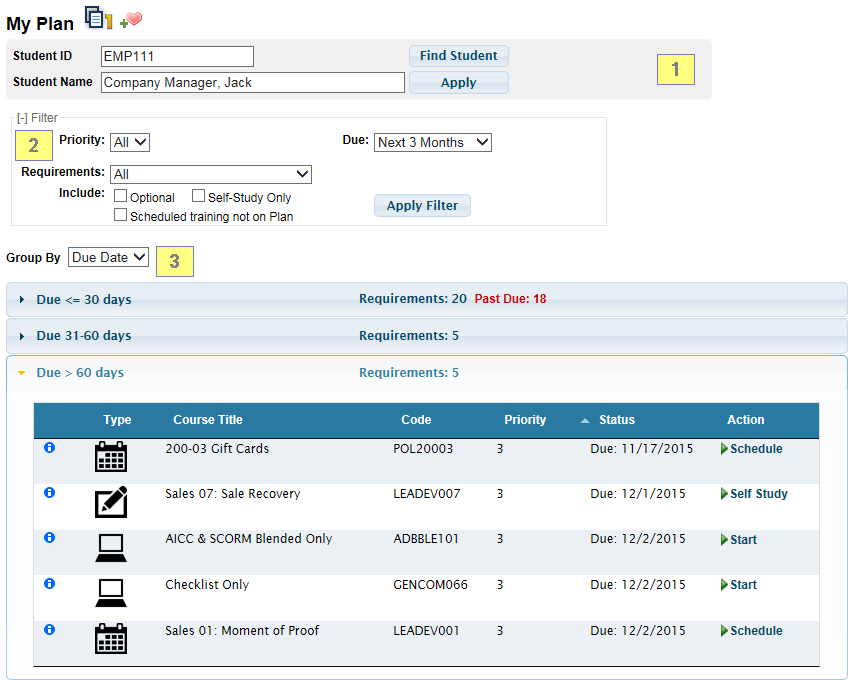
Notice that the Student Selector is hidden when you are not set as anyone's supervisor.

As a supervisor, you may view the training plans for students that have been assigned to you.
You can:
enroll them into, or cancel, classroom training
resume a course to complete an online Checklist Lesson
You cannot:
launch online training
take tests
complete evaluations
In the example below, you can see the Action column is blank for the "Online Test Only" course because a Supervisor is viewing a student's My Plan page. They cannot start online training for another student.

Once you select another student, click the Apply button to view their records.
You can select another student by:
Entering their ID
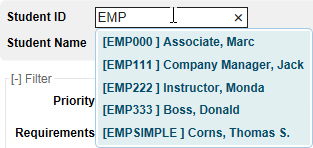
Entering their Name

Using the Find Student Tool
Launch the tool by clicking the Find Student button in the student area.
Once open, you can click on a name to select it.
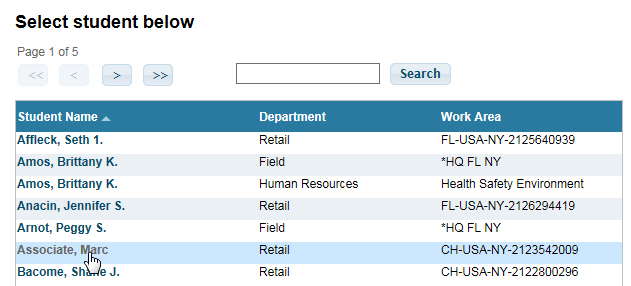
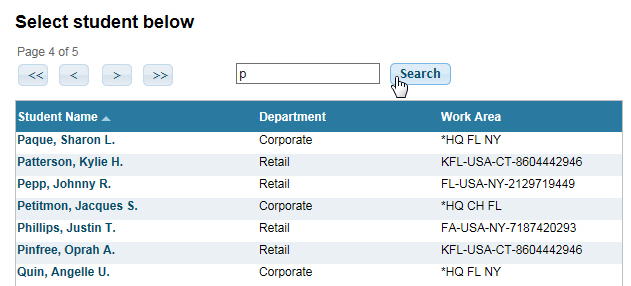
You can also use the paging controls or the Search button to find the student within the list.
In the image below, by entering "p" in the search box and clicking the Search button, the first person with a last name that starts with "p" was found.
Once a student is selected, you will see their VTA Profile Picture in the student selector area (if they have one) and a Go To Me link to the right of the Student ID field.
If you are viewing another student, you can quickly go back to viewing your own records by a single click of the Go To Me link.

There are several options for filtering your My Plan records.
Your System Administrator has selected the default view for your organization, but you can make changes to any option and then click the Apply Filter button to view the results.
You can filter by the Priority associated to the requirement assignment.
Each training organization determines the meanings of each Priority value.
Contain your system administrator to learn more about your organization's approach to using these values.
You can filter the training plan so that only items with a Due Date (as seen in the grid's Status column) during the selected time period are displayed.
The following filters are available:
All - All training is shown, including those that are no longer due (with an "OK" in the Status column).
To Do List - All training with a Due Date are shown.
Next 3 Months - Training that is either past due or due within the next 3 months are shown.
Next 6 Months - Training that is either past due or due within the next 6 months are shown.
Next 12 Months - Training that is either past due or due within the next 12 months are shown.
This Year - Training that is either past due or due by the end of the current year are shown.
Requirements may be assigned to you in one of three ways:
Teams to which you are assigned.
Your Job Title.
Individually assigned to you.
You can use the Requirements filter to limit the results for requirements assigned through a specific method or select "All" to view requirements assigned to you in any way.
For example, you can filter the plan to show only requirements assigned to you via your Job Title.
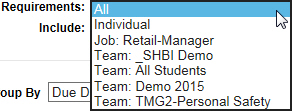
Remember: Running your Student Status Report shows every course currently assigned to you and why (Requirement Type column).
 Note: "Job Title" and "Team"
are re-nameable fields. The fields may be labeled something different
in your system.
Check this box to display Optional training (associated to you, but without a Due Date).
Check this box to limit your view to only show self-study training.
If not checked, both self-study and instructor-led training (as well as "blended learning") will be shown.
If this box is checked, instructor-led training you are currently enrolled to attend, but is not assigned as a "Requirement", will be shown.
Once you select a Group By option, it will be applied.
Each grouping header will show:
You can display the grid in one of two Group By options:
Due Date
Show All
When grouped by "Due Date", your plan will be displayed in expandable/collapsible 3 sections.
When you expand a group by clicking on its header, the others collapse.
The 3 sections are:
Due <= 30 days - Overdue training or due within the next month.
Due 31-60 days - Items that are due within the 31-60 day period.
Due > 60 days - Items due after 60 days.
 Note: If you have the "Scheduled
Training not on Plan" 'Include' option selected, any non-required
training that you are currently enrolled to attend will be displayed in
the "Due > 60 days" section, after all of the required training.

"Show All" is essentially not grouped. Everything according to your applied Filter selections will be displayed.

The results grid will have the following columns:
Tooltip
Type
Course Title
Code
Priority
Status
Action
All columns except the Tooltip and Type columns are sortable by clicking the column header name.
Hover over the Advanced Tooltip icon to display additional information about the training requirement.
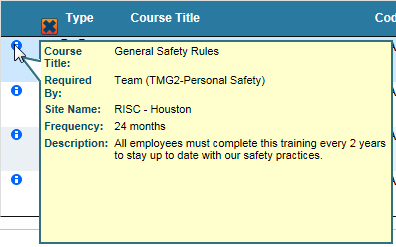
This column will display an image to visually indicate the requirement's training Type .
You can hover over the image on the grid to determine what it indicates.
There are four Types you will see:
Online |
Instructor-led |
Self-Study |
Requirement Group |
|
|
|
|
 Your System Administrator may have chosen
different icons for training types. The ones shown above are the
defaults.
This is the Course Title or the Requirement Group name of the assigned training.
 Note: A 'Requirement
Group' is created by your system administrator to allow you to
take one (or more) of several courses to satisfy a training need.
The unique Course Code that identifies the course.
 Note: You can learn more about your
system's Course Codes by reviewing your Catalog.
Each training requirement has a Priority of "1", "2", "3", "4" or "5".
 Remember: Your training organization
determines the meaning of each Priority value. Contact your system administrator
to learn more about your organization's approach to using Priority.
There are several status messages that may be displayed:
Due - The date by which the training should be completed is shown.
Scheduled - The instructor-led training is required and the session date that the student is currently enrolled to attend is shown.
Wait Listed - The student is on a waiting list for a scheduled class.
Pending - The instructor-led training is required, and the session date is shown, but the student's enrollment is pending their Primary Supervisor's approval.
 Note: "Pending" will be displayed
if the student is on the Wait List or not. Once approval is granted, the
'Status' will update to "Scheduled" or Wait Listed".
Not on Plan - The instructor-led training is not required, but the student is currently enrolled to attend; the session date is shown.
OK - The training requirement has been satisfied by the student completing it or an override was applied by the system administrator.
Optional - The training requirement is optional, but not complete.
Optional-OK - The training requirement is optional and completed.
Several types of links may be shown in the Action column:
Start - Click to see the Course Description of a Self-Study Course that contains online Lessons (so you can start it).
Resume - Click to see the Lessons of a Course that:
is Self-Study, you have already started it, but you have not completed all required Lessons.
is instructor-led, you are enrolled to attend, and Pre or Post-Class Lessons exist (i.e., an online pre-test).
is instructor-led, and you have attended, but Post-Class Lessons are pending completion (i.e., an online evaluation).
Schedule - Click to view the Class Schedule and enroll into a session.
Cancel - Click to cancel enrollment, or drop off a wait list, for an instructor-led session.
Self-Study - Click to see the Course Description of a Self-Study Course that does not contain online Lessons (so you can learn how to get credit from your system administrator).
View Detail - Click to view the Requirement Group details (one or more course options are available for the training requirement).
View - Supervisors (only) can click to see the Lessons of in-progress training (training is considered in-progress for the same reasons mentioned above for the student "Resume" Action).
 Remember: a Supervisor cannot launch
online training, take tests or complete evaluations for another person.
There two are additional formatting scenarios applied to grid results:
When sorted by Status, you will see a bar between items at the point where the year of the Due Date changes.
All items due in the current year will appear above the bar and all items due in the following year will appear below it.

When not sorted by Status, no bar appears on the grid.

If an item on your My Plan page is overdue as of the current date, you will see the row in red text.
